How to Design Responsive Website (Automatic Display Resizing)
Somebody ask me, "could you create a website that the display can auto resize for mobile phone, tablet, or etc?", I said "YES, OF COURSE!". Well, automatic display resizing in website is called Responsive Website. It means that your site have auto respons with screen, it auto resize and fit with the screen. For example, you can open the facebook site. you can compare www.facebook.com with m.facebook.com.
 |
| Picture 1. Comparation of CSS Bootstrap Usage in Facebook |
In the picture 1, you can see if m.facebook (rightside) can automatic resize the display with google chrome screen. It's not happen in www.facebook.com (leftside), the display doesn't respons with google chrome screen. Another ways to check if the site is responsive that you can open m.facebook in another gadget and see if the display, picture and font is responsive.
To build the website like that, you don't need to modify your html or php code, but you need to add some CSS and JavaScript features. There are many frameworks you can use to build responsive website, included that CSS and JavaScript features, but I suggest this one CSS frameworks. It is called CSS Bootstrap or Twitter Bootstrap.
What is CSS Bootstrap?
CSS Bootstrap or in another name called Twiter Bootsrap is CSS Framework that build by Twiiter and developed by Mark Otto and Jacob Thornton (twitter developer) at Twitter to encourage consistency accross internal tools. And it developed with free and Open Source license. So all web developers in the world can use this for free, thank you twitter, my 100 respect for you!
Features
There are many features that help you build responsive website with css bootsrapt :
1. Understanding the CSS stylesheet.
2. Re-usable components.
3. JavaScript components.
4. Easy to use, and etc.
So, to design responsive website (automatic display resizing) you can use CSS Bootsrap, and how to use it? You can follow my articles about CSS Bootstrap in this blog. Enjoy the coffea!
How to Install Yii Framework in Windows Localhost
Not as I thought, Installing Yii Framework in Hosting is not easy as Installing Yii Framework in Windows because there are problems with that. You can read the problems at my article here : Problems When Installing Yii Framework via Softaculous cPanel. Now I will prove if installing Yii in Windows is very easy, just follow the tutorial below, and read the comparation between installing in local windows and hosting at the end of this tutorial.
To installing Yii Framework in Windows, many people say if you should check the requirement first. Well, for me that's not important, you just have to download the latest XAMPP to installing the latest Apache and MySQL. And to installing XAMPP, you can follow my tutorial here : Fast Way to Installing XAMPP in Windows (Trusted).
- First, we really should to do is configuring Environment Variables, because to installing Yii we need to run Yiic.bat by Command Prompt. Go to Windows Explorer > My Computer and then right clict at the Properties.
 |
| Picture 1. My Computer Properties |
- Click Advanced System Settings > Advanced.
 |
| Picture 2. Environment Variables |
- click Environment Variables button.
- At the System Variables group panel, click the Choose Path and click the Edit button. It will appears the window of Edit System Variable.
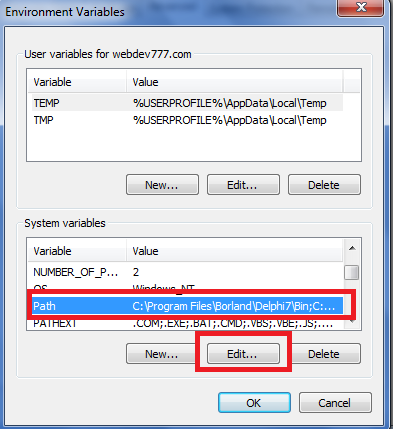 |
| Picture 3. Environment Variables |
- At the Variable value field, put ;C:\xampp\php at the end of the value.
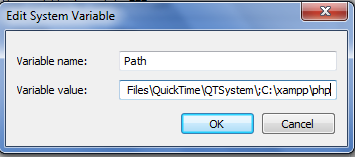 |
| Picture 4. Edit System Variable |
- Now, it's time to installing Yii Framework.
- Download Yii Installation Files at the official website.
- Extract that file into C:\XAMPP\htdocs\foldername. Rename the folder with easy name like yii777 or etc.
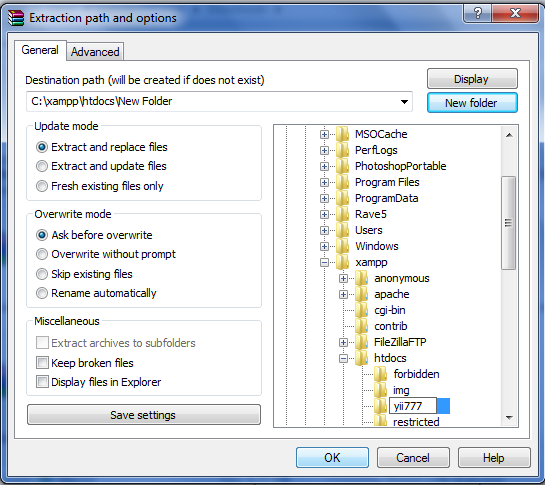 |
| Picture 5. Extract Yii |
- Open Command Prompt, type cd\xampp\htdocs\yii777\framework and then type Enter.
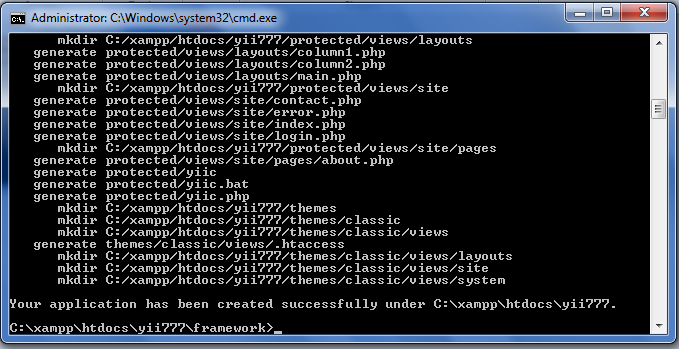
- Type Yiic webapp C:\xampp\htdocs\yii777 and then type y + Enter.
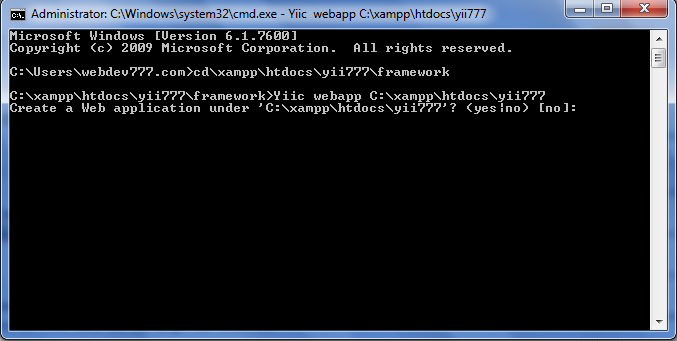 |
| Picture 6. Installing XAMPP using CMD |
- If your success, then it will show : "Your application has been created successfully".
 |
| Picture 7. Yii Installation Success |
- To access the web, run the XAMPP services and then click this link http://127.0.0.1/yii777.
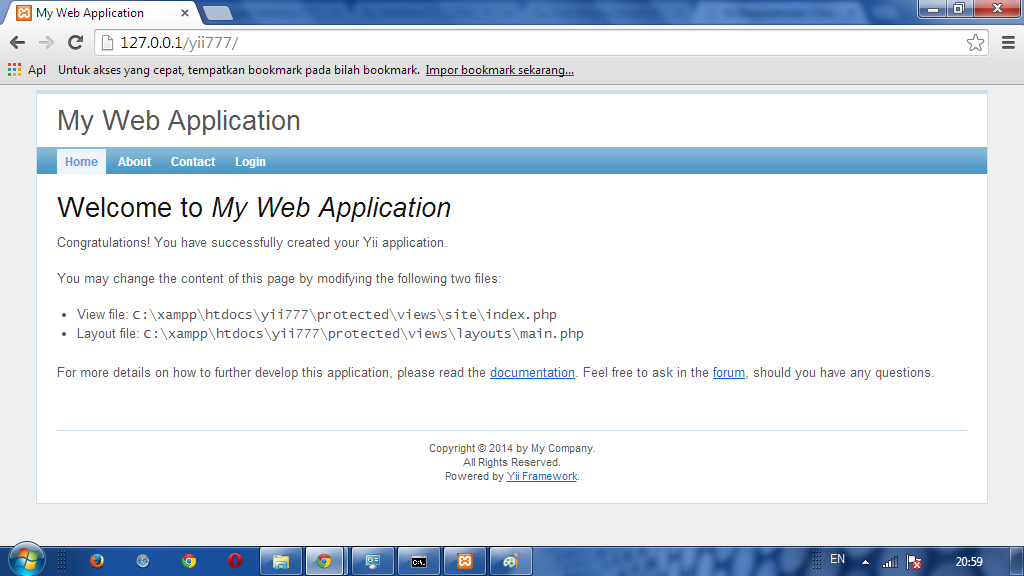 |
| Picture 8 . Yii Home Page |
So, you have finished installing Yii in localhost Windows, easy right? But why it cannot installing in web hosting? Allright, it is because the system operation that used by web hosting is not windows, but Linux. Linux cannot run .bat file, that need to installing yii framework by commnad prompt. So, I want to find how to install Yii Framework without command prompt or that .bat file. I believe if I can install without that's all, I can install it in Hosting. So that's all.
Enjoy the coffea!
Fast Way to Install XAMPP in Windows (Trusted)
I have reason why I should write this mainstream tutorial, but this is not about SEO or technique one day one article. I write this tutorial because I want to being this tutorial to be reference for my next tutorial that need to install XAMPP. Well because this tutorial is not too important and too mainstream to read so just go to the point.
- First, download XAMPP in the official website here : XAMPP Web Site or XAMPP in SourceForge.
- After download that file, now run the installation as Administrator (recommended).
 |
| Picture 1. XAMPP Setup |
- Click Next.
- Select all components that you need to install (select all recommended), and then type next.
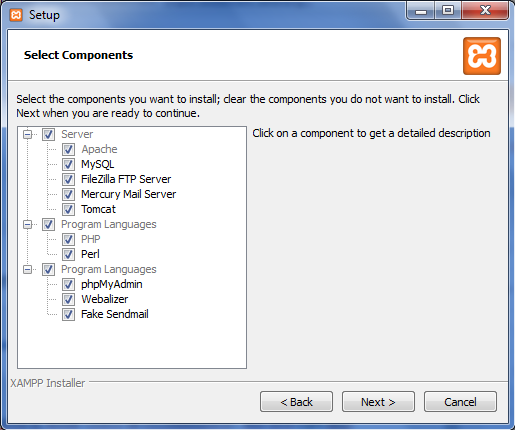 |
| Picture 2. Select Components |
- choose a folder to install XAMPP (C:\XAMPP).
- Now, just click Next, Next and Next until the installation finish.
All you need is just click next from begining :D | ENJOY THE COFFEA!
Problems When Installing Yii Framework via Softaculous cPanel
I have just installed Yii via Softaculous in cPanel but unfortunately there are some problems. I have known if there are somethings wrong with this softaculous when provide yii installation because when I check the demo in softaculous, it says There is no demo for this script. Just like the picture below :
 |
| Picture 1. Yii Demo in Softaculous |
So, when I install this framework via Softaculous using this tutorial it has no result when I try to access the web page in browser. I try to digg depper in hosting and then I found something if there is no index.php file in there. Well it is miracle yii framework without index.php file because it is bootstrap file that linked to all file (nobody newbie knows :p).
 |
| Picture 2. Yii installation file via softaculous |
When you see that files, it looks familiar right? That's true because that's all are yii installation files. It means when you installing Yii Framework via Softaculous, it just copying Yii installation files into your hosting. So you have to install it again using that file. How to do that? Check my next tutorial, Okay :D
How to Installing Yii Framework in cPanel via Softaculous
Well, I confuse to start writing Yii Framework, should I write about definition, history, or about Framework? So, I think I have to write something important then theory so I decide to write about How to Installing Yii Framework in cPanel via Softaculous. Why using cPanel? Because in cPanel there are many feature that help you installing Yii Framework with easy way.
Okay, here we go ..
- First you have to do is login to your cPanel.
- Go to Software/Services and choose Softaculous (it's usually at the bottom of cPanel form). If your cPanel doesn't provide Softaculous, you can contact you hosting provider.
 |
| Picture 1. Softaculous |
- Go to Frameworks and choose yii.
 |
| Picture 2. Yii Framework |
- .Click the INSTALL button.
 |
| Picture 3. Installing Yii Framework |
Congratulations, the software was installed successfully
UPDATE :Problems When Installing Yii Framework via Softaculous cPanel
Encapsulation, Inheritance, and Polimorfism in OOP PHP
A. Encapsulation
Encapsulation has correlation with visibility or hiding information, it means we create data that cannot be accessed except via method or function that we created. Encapsulation implementation used the function of setter and getter that I’ve ever told in the previous OOP article. In that article I made the tutorial about encapsulation when property and method in class is protected by keyword “private or protected”.
Look at the script below that I mention in the previous article. In this script I’ve implementing encapsulation :
 |
| Figure 1 Implementing Encapsulation |
B. Inheritance
Inheritance means, we can create a new class use existing class, exist class called parent class and new class that created via parent class called child class. The purpose from inheritance is to reuse the code we have created with adding new property and method.
To create a new class that inherit characteristic from another class you need to using keyword extends. Here is the formula to creating child class using keyword extends.
child_class extends parent_class
First type the name of child_class and then following by keyword extends and the name of parent_class. Now, let’s create 2 simple class, they are class Parent and Child. Look at the picture below :
Script 1. Implementing Inheritance
<?php
class Parents {
public function helloParent() {
echo "This is parent class ...<br />";
}
}
class Child extends Parents {
public function helloChild() {
echo "This is child class ...<br />";
}
}
$objectChild = new Child();
$objectChild->helloParent();
$objectChild->helloChild();
?>
If that script run, then this is looks like in browser :
 |
| Figure 2 Implementing Inheritance |
There are two class appears in browser even we just create one class that’s because class Child inheritance from class Parent. Now we will continue about visibility protected in the previous tutorial, let’s modify class Parent and Child in the script above by adding one protected property in class Parent with name $name and one method in class child with name printParentName(). So this is the script :
Script 2. Implementing Inheritance with Protected Visibility
<?php
class Parents {
protected $name = 'Leonardo Da Vinci';
public function helloParent() {
echo "This is parent class ...<br />";
}
}
class Child extends Parents {
public function helloChild() {
echo "This is child class ...<br />";
}
public function printParentName() {
echo "Parent Name : $this->name <br />";
}
}
$objectChild = new Child();
$objectChild->helloParent();
$objectChild->printParentName();
$objectChild->helloChild();
?>
Property $name in parent class that using protected will run by method printParentName() in child class. When the script run then the name of parent class “Leonardo Da Vinci” will appear even the method run by child class. Look at the picture below :
 |
| Figure 3 Implementing Inheritance using Protected Visibility |
It is proving that protected visibility can accessed via child class.
C. Polimorfism
Polimorfism is simple, in the previous tutorial you have used polimorfism. Polimorfism is a process creating one or more new object at some class. Let’s we reopen the script in previous tutorial, look at the script below :
Script 3. Implementing Polimorfism
<?php
class people {
private $name;
function __construct($name) {
$this->name=$name;
echo "Constructor : $this->name created <br>";
}
function speaking() {
echo "Hallo, my name is ".$this->name." <br />";
}
function __destruct() {
echo "Destructor : $this->name deleted <br/ >";
}
}
$people1 = new People("People 1");
$people1->speaking();
$people2 = new People("People 2");
$people2->speaking();
?>
Well, the text I colouring is polimorfism ....
Constructor and Destructor in OOP (PHP)
In OOP, you will never separate from constructor and destructor. What is constructor and destructor in OOP? Constructor is special statement (also called special method) that created when an object created (instance of class).
If you didn't create the constructor or destructor in a class then
constructor and destructor automatically created. When you create $objPeople in the previous OOP tutorial, then constructor and destructor automatically created
Normally,
the constructor is created to provide an initial operation to be
performed when an object created (inilization object). This is the
writting format how to create a constructor
| function __constructor(parameter) { code } |
Keyword construct should started with double underscore and then give the parentheses (). Among the parentheses, you can give the parameter if you think you need to add parameter. Then you can build your code in constructor.
Eg you create class product, in that class include property of quantity that the initialize value shuld be 0, then the code will look like below :
| class barang { private name; private price; private quantity; function __construct() { $this->quantity = 0; } } |
If the constructor created and used when the object created, then destructor is the reverse of constructor. Destructor created and used when the object deleted. In PHP programming, destructor automatically called in your final PHP scripting.
Same like constructor, writing format of destructor begin by double underscore. Here it is :
| function __destructor(parameter) { code } |
And this another example of constroctor and destructor :
| <?php class people { private $name; function __construct($name) { $this->name=$name; echo "Constructor : $this->name created <br>"; } function speaking() { echo "Hallo, my name is ".$this->name." <br />"; } function __destruct() { echo "Destructor : $this->name deleted <br/ >"; } } $people1 = new People("People 1"); $people1->speaking(); $people2 = new People("People 2"); $people2->speaking(); ?> |
And this is the result in browser :

In the picture above, there are six teks, the result from calling the constructor, calling method speaking(), and calling destructor. Though you don't put code call method __construct() & method __destruct(). This happen because when you create an object, it's automatically creating constructor for the object. Then when it has used, it will removed from memory. It's automatically the destructor from that object will be called.
Here is the example of the use constructor, destructor, method, object, and property for calculating the student's grade.
And the looks like in browser is :

Public, Private, and Protected (Member Visibility) in OOP PHP
In OOP we will always find keywords Public, Private, and Protected. These three things are used to determine the visibility of members (properties and functions) that are characteristic of object-oriented programming. Are members globally accessible (public) or accessed by its class (private) or accessed by the class and subclasses. Meanwhile, if the procedural programming members can only be accessed globally.
A. Public
In public visibility, a method or property can be accessed globally. That means it can be accessed on the inside and outside of class or in other words the properties and functions are known globally. In OOP PHP tutorial for Beginers previously, we have made $objPeople which the visibility of properties and function are public.
This is another example of class with public visibility :
Script 1.
<?php
class student {
public $sid;
public $name;
public $point;
public function processPoint () {
echo "Students with sid $this->sid <br />";
echo "name $this->name <br />";
echo "get point $this->point";
}
}
$objStudent = new student();
$objStudent->sid = '3310901051';
$objStudent->name = 'Hermanto';
$objStudent->point = 90;
$objStudent->processPoint();
?>
And this is the result looks like in browser
 |
| Picture 1. Public member visibility |
B. Private
If public can accessed by global then private visiblity means that the member (method or property) in a class are accessible only within its own class.
Let's modify the script at class student by changing the property visibility to be private.
Let's modify the script at class student by changing the property visibility to be private.
Script 2
<?php
class student {
private $sid;
private $name;
private $point;
public function processPoint () {
echo "Students with sid $this->sid <br />";
echo "name $this->name <br />";
echo "get point $this->point";
}
}
$objStudent = new student();
$objStudent->sid = '3310901051';
$objStudent->name = 'Hermanto';
$objStudent->point = 90;
$objStudent->processPoint();
?>
If we run the script 2, it will display an error message because the property sid, name and points have private visibility, so that the data accessed by outside of class can not be done. So how do the private property that is accessible outside of class so that it can be used by objects that need it? The solution is to use the function setter and getter.
Setter is used to create a (set of) value for a property. This function is generally used for properties that have private and protected visibility. Setter is often used to validate incoming data before the data is loaded on a property. While the getter is used to generate (get) a value of the member public, private, or protected from the result.
How to access private member with that function?
Script 3
<?php
class student {
private $sid;
private $name;
private $point;
function setSid($x) {
$this->sid=$x;
}
function setName($x) {
$this->name=$x;
}
function setPoint($x) {
$this->point=$x;
}
function getSid() {
return $this->sid;
}
function getName() {
return $this->name;
}
function getPoint() {
return $this->point;
}
function Point () {
echo "Students with sid $this->sid <br />";
echo "name $this->name <br />";
echo "get point $this->point";
}
}
$objStudent = new student();
$objStudent->setSid('3310901051');
$objStudent->setName('Hermanto');
$objStudent->setPoint(90);
$objStudent->point();
?>
In the script above, we use function setters and getters for each property that has a private visibility. Making the value of the function by taking the value setter and getter done by function. In the getter is used "return" value because the getter will return the value of the property taken by the data.
Note how to calling the property after instancing $objStudent, calling the property is done by calling the names function with ($objStudent-> setSid()). Although become longer code lines, but more OOP recommend this method for accessing a Member.
If the script is run in the browser then the result will be the same as the picture below :
 |
| Picture 2. Calling private visibility with setter & getter function |
C. Protected
Protected almost SAME to the private that can only be accessed by its class and protected can also be accessed by its subclasses. Let's try changing the script 1 and we will change the visibility of the member be protected like the script below :Script 4
<?php
class student {
protected $sid;
protected $name;
protected $point;
public function processPoint () {
echo "Students with sid $this->sid <br />";
echo "name $this->name <br />";
echo "get point $this->point";
}
}
$objStudent = new student();
$objStudent->sid = '3310901051';
$objStudent->name = 'Hermanto';
$objStudent->point = 90;
$objStudent->processPoint();
?>
If the script is run in browser then the result will error : cannot access protected property.
The error occurred because the protected class can only be accessed by its class and subclasses. For more detailed discussion of inheritance protected in subclasses will be explained on the nexy tutorials on The Inheritance.
What is AJAX and How to Use it With jQuery

Are you questioning What is AJAX, and How to Use it With jQuery? To answer the long question, we need to start it from the meaning of AJAX. No, it is not football club from Holland but AJAX is asynchronous JavaScript and XML. People use AJAX to load data from a server and then display it on the webpage without the need to reload the page. With AJAX, you will see only part of the website is changed while the other remain the same because the page is not refreshed. If you still confuse, you can open your Gmail and switch from “inbox” to “sent mail”. You will see the content is different but the page is the same. AJAX call is something you do behind the scene.
So, what is the benefit of AJAX?
- Minimize Bandwidth Usage
AJAX can work without reloading page, so you don't need to refresh and excedded your bandwidth usage.
- Faster
Facebook is one from many website that using AJAX. When new notifications coming, it will show you the alarm or notification info in right top position of your facebook page, that's work by AJAX. You can imagine how it works without AJAX, you don't know if there are new notifications coming, you should refresh your facebook page to know that.
- User Friendly
You don't need to refresh the page if you want to see the changes.
Now that you know what AJAX is, we are half way. To complete the answer for What is AJAX, and How to Use it With jQuery we need to continue with it application with jQuery. If you wonder why jQuery, people love it because jQuery supports AJAX in fantastic way. Even more, you will find the implementation is very easy. One important thing is to tell the browser whether to catche AJAX or not, especially since different browsers will behave in different ways.
Here is how to do it :
$.ajaxSetup ({
cache: false
});
This is the example :
$.ajaxSetup ({
cache: false
});
var ajax_load = "<img src='img/load.gif' alt='loading...' />";
// load() functions
var loadUrl = "ajax/load.php";
$("#load_basic").click(function(){
$("#result").html(ajax_load).load(loadUrl);
});
Example of $.ajax with success is:
$.ajax({url:'/'}).done(function(data){});
Now you have the answer for What is AJAX, and How to Use it With jQuery. This is the time to apply it and see what happen.
HTML Basic Part 2
Meet Again ! as
Usual This is R1O as the guest Author. I will continue explain the part from
the first tutorial in this HTML Series. If you have not yet read the first
tutorial i suggest you to read the first one otherwise you will get lost. Trust
me ...
So far we have
write this code in our text editor
<!doctype>
<html>
</html>
And the last
discussion we talk about tag. So now
just add the <head> tag
opening and closing in the <html>
area in your text editor. Like the example below.
<!doctype>
<html>
<head>
</head>
</head>
</html>
Now, What is the
tag <head> is use for ?
The tag
<head> is use for processing advance programming stuff like javascript,
PHP, and etc..
Just remember
this “ all the cool stuff that you look
at the website is processing at here “ the <head> tag “ “.
Allright now we
gonna add <title> tag. write
this code below on your text editor. And save it. Remember the format of the
save file is .html
<!doctype>
<html>
<head>
<title>
</title>
</head>
</html>
<title> tag what’s that?
The <title>
tag is use for make title or description on the browser tab.
So now try add
the title or description. Type this code on your text editor and save it.
<!doctype>
<html>
<head>
<title>
My site
</title>
</head>
</html>
It should look
like this in your web browser , in this case i use internet explorer:

you can change
the name as you like this is only the example.
Now let’s jump to
the <body> tag. Write the code as seen on below:
<!doctype>
<html>
<head>
<title>
My site
</title>
<body>
</body>
</head>
</html>
<body> tag ?
<body> tag is use for make the appereance in the web. If
you see the website paragraph or picture it’s written this section the
<body> tag. I show you the picture so you can get the clearer picture:

You see the white
space is called the <body> area.
Where the upper left is starting point to positioning things in the website. Is
like the cartesius diagram that we learn from school in mathematic subject. The
difference is the starting point instead from the middle in website is start
from the upper left.

That’s for today. We gonna cover how to add
somes stuff in the <body> tag in the next tutorial. So stay tune !


